Back in December I wrote a blog about GreenPan frying pans. GreenPan are designed to be environmentally friendly and use an alternative non-stick coating called Thermolon that doesn’t contain PTFE.
Further still, not only have they increased their range of products, but also their choice of styles too. Whether you want a hard anodised, stainless steel or aluminium pan, there will be something for you - and the ranges cover a variety of price points.
We are now on FoodBuzz as Chichester Cookshop. I only made the account this afternoon so it is looking a bit bare, but I will build it up over time and there will be lots for you to look at hopefully.
FoodBuzz is an online community for foodie people that want to share recipes and restaurant reviews and generally love all things culinary.
So, make your profile and add some bits. Then browse the databases and you need never be stuck for recipe inspiration ever again.
For me, soup is one of the most comforting foods in the winter. As soon as the leaves start to turn red, my vacuum flask comes out of the cupboard and I start trawling for quick simple recipes. I get really cold at work and soup keeps my cockles warm and my cheeks rosy, plus its cost effective to make in batches and a whole lots more imaginative and exciting then my packed lunches.
Olive Oil
Knob of Butter
1 large onion, peeled and roughly chopped
2 cloves of garlic, peeled and roughly chopped
A thumb-sized piece of fresh ginger, peeled and roughly chopped
1 tablespoon garam masala
6 parsnips, peeled and chopped into chunks
500ml milk
1 litre vegetable stock
Sa salt and freshly ground black pepper
1 fresh red chilli, deseeded and finely sliced
Optional: a handful of fresh coriander leaves
Crusty bread, to serve
Heat a splash of olive oil and the butter in a large saucepan. Add the onion, garlic, ginger and garam masala. Gently fry for around 10 minutes, until the onions are soft and sweet.
Drop in the chopped parsnip and stir together so that everything gets coated in the oil and flavours. Pour in the milk and stock, season well and bring to the boil. Turn down the heat and simmer for 30 minutes with a lid on.
After half an hour, check that the parsnips are cooked by sticking a knife in. If you’re happy, remove them from the heat and carefully whiz up using a hand blender or liquidizer. Taste the soup to see if it needs a little more salt or pepper.
Serve with a sprinkling of sliced red chilli, a few coriander leaves if you like, and a good chunk of crusty bread.
Tip: Use coconut milk instead of regular milk for a twist.
As you may, or may not know, the River Cottage team have been writing handbooks to help guide you to the ethical bliss of the RCHQ lifestyle. The first two, Mushrooms and Preserves have been extremely successful and Dan the Baker has just launched book number three: Bread.
Personally, I adore homemade bread and wish I could make it more often and more successfully. My soda bread keeps coming out dry and tough, and my rolls never seem comforting enough for my liking. Short of having Daniel Stevens make all my bread (something I would quite like to happen, although extremely unlikely), I am going to have to settle for his handbook to help me.
Everyone seems to have gone tagine crazy recently, and it really does seem to be the new dinner party trend. There are lots of tagines out there and it is important to buy one that will last and can do everything you want it to. The cheaper terracotta ones, are a bargain but they have to be used with a heat diffuser and are known to crack – the age old trick of putting water in the top dimple really does become a necessity.
The Emile Henry Flame line is designed for kitchen use, meaning the designers have thought of everything: it is suitable on all hobs as well as being dishwasher safe. Priced slightly cheaper then the Nigella tagine, and available in a variety of colours; the Emile Henry Tagine is the ideal investment to show off on the dinner table.
It’s January, everyone is tucked-up inside out of the cold. This means that everyone is at home and spending more time looking at their furnishing then they normally do.
If you are bored of your kitchen but don’t want to re-decorate the whole thing, re-accessorize your kitchen. Just as you might update an outfit with new accessories, the rules apply to your home as well.
It doesn’t even have to be that noticeable, expensive or drastic. Why not give you kitchen a green, eco feel with an organic apron and oven glove set, a green teapot and an olive tagine – accessorizing can even open up new culinary avenues.
The trick is to choose key pieces that fit your look and to go from there. Black and Red has been the most popular colour scheme for our customers this winter, as we move into spring, more people are buying Cream.
Based just down the road from Chichester, Lime Food Design caters for events across the south, from London to the Home Counties. Their events are fabulous and range from intimate dinner parties and picnics, to corporate events and weddings.
Providing London-influenced catering outside of the city, Lime will handle your event with professional management, bringing an innovative ambience to suit your requirements. Having seen photos of their events, I can safely say that they use their imagination and personalise everything. From drinks in test tubes for wacky science themes, to ice-sculpture entertainment in the shape of a cruise ship, your event is sure to be catered to your needs.
Something I like about Lime, is that whilst a lot of their work is contemporary and stylish, their ethics are just, and their roots are in the traditional:
‘Highly personal, friendly service on a bed of fresh, locally sourced ingredients scented with contemporary class & sophistication, and a squeeze of the traditional.’ – Lime Food Design
The trailer this year doesn’t disappoint and is definitely worth a watch – it is one of my favourite adverts on TV at the moment, and I giggle at the end shot of Hugh every time.
Here is the trailer from last year for your amusement. A year on and several viewings later I still find it funny.
2009 has started and the new product catalogues have started rolling in.This means that we will be updating some of the ranges on ChichesterCookshop.co.uk and some new products will be appearing.
I don’t want to ruin any of the surprises in store, but lets just say that there are a few nice woks and some interesting aprons to be had.
So… keep your eyes peeled and sign up to the blog to have all the news delivered straight to your inbox.
I absolutely love butternut squash and since my friend made me try it a few years ago, I have never looked back. They are great for storing as they last for months, and if you’re a good enough gardener to grow them, they will see you through the winter. However wonderful they are, it is easy to eat them the same way all the time. So, why not make them into something sweet.
As Jamie says: My kids love these squash muffins. They taste a bit like carrot cake, as the two vegetables are very similar – I’ve simply swapped carrots for squash. Both of them are wonderful carriers of flavours like cinnamon, cloves and vanilla. The skin of a butternut squash goes deliciously chewy and soft when cooked, so there’s no need to peel it off. Give these little cakes a go – they’re a perfect naughty-but-nice treat. And a great way of getting your kids to eat squash!
Butternut Squash Muffins with a Frosty Top Ingredients 400g butternut squash, skin on, deseeded and roughly chopped 350g light soft brown sugar 4 large free-range or organic eggs sea salt 300g plain flour, unsifted 2 heaped teaspoons baking powder a handful of walnuts 1 teaspoon ground cinnamon 175ml extra virgin olive oil
for the frosted cream topping zest of 1 clementine zest of 1 lemon and juice of ½ a lemon 140ml soured cream 2 heaped tablespoons icing sugar, sifted optional: lavender flowers or rose petals 1 vanilla pod, split lengthways and seeds scraped out
Preheat the oven to 180°C/350°F/gas 4. Line your muffin tins with paper cases.
Whiz the squash in a food processor until finely chopped. Add the sugar, and crack in the eggs. Add a pinch of salt, the flour, baking powder, walnuts, cinnamon and olive oil and whiz together until well beaten. You may need to pause the machine at some point to scrape the mix down the sides with a rubber spatula. Try not to overdo it with the mixing – you want to just combine everything and no more.
Fill the paper cases with the cake mixture. Bake in the preheated oven for 20 to 25 minutes. Check to see whether they are cooked properly by sticking a wooden skewer or a knife right into one of the cakes – if it comes out clean, they’re done. If it’s a bit sticky, pop them back into the oven for a little longer. Remove from the oven and leave the cakes to cool on a wire rack.
As soon as the muffins are in the oven, make your runny frosted topping. Place most of the clementine zest, all the lemon zest and the lemon juice in a bowl. Add the soured cream, icing sugar and vanilla seeds and mix well. Taste and have a think about it – adjust the amount of lemon juice or icing sugar to balance the sweet and sour. Put into the fridge until your cakes have cooled down, then spoon the topping on to the cakes.
Serve on a lovely plate (or on a cake stand if you’re feeling elegant, or on a rustic slab if you’re more of a hunter-gatherer type!), with the rest of the clementine zest sprinkled over. For an interesting flavour and look, a few dried lavender flowers or rose petals are fantastic.
Here at ChichesterCookshop.co.uk we listen to Radio 1 and this morning Sara Cox received a text from a listener that wanted to know where they could get a banana case as their banana was bruised and mushy from the journey to work.
As seen on the Dragon’s Den, Fruity Faces and are now out in the shops. Available in a banana shape, football or tiger design, the inflatable carrier creates an air pocket around your fruit keeping it cool and safe until snack time.
The Nigella Lawson tagine has been one of the Chichester Cookshop best sellers over the late December – early January period. As it has been so popular with our customers I thought I would find another recipe for everyone to try.
Here is a James Martin recipe for a vegetarian tagine that was featured on BBC’s Saturday Kitchen. It looks absolutely yummy and ideal for those trying to lose a few pounds and detox after a seasonal binge.
If you don’t have a tagine yet, have a look at Nigella Lawson’s Flameware range. It’s beautifully crafted and ideal for oven to table cooking.
Ingredients for tagine 2 tbsp olive oil
1 onion, thickly sliced
2 garlic cloves, finely chopped
1 tsp ras el hanout
½ tsp ground cinnamon
½ tsp ground ginger
½ tsp smoked sweet paprika
½ tsp ground cumin
¼ tsp freshly ground black pepper
1kg/2lb 4oz sweet potatoes, peeled and cut into large chunks
1 x 400g/14oz can chopped tomatoes
2 tbsp honey
½ tsp saffron
200ml/7fl oz water
40g/1½oz preserved lemon, finely chopped
125g/4½oz dried apricots, halved
110g/4oz green olives, stones removed
40g/1½oz whole almonds
1 small bunch coriander
Ingredients for couscous 200g/7oz couscous
2 tbsp extra virgin olive oil
10g/½oz preserved lemon, rinsed, drained, pulp removed, flesh finely chopped
½ lemon, juice only
2 tbsp chopped fresh coriander leaves, to serve
For the tagine heat a large, deep frying pan with a lid until hot. Add the olive oil, onions and garlic and cook for 2-3 minutes.
Add all of the spices and fry for one minute.
Add the sweet potatoes and stir well.
Add all the remaining ingredients, except the coriander, stir well and bring the mixture to a simmer.
Chop the coriander stalks, reserving the leaves for later, and add the stalks to the pan. Reduce the heat, cover with a lid, and simmer for 15-20 minutes, or until the sweet potato is just tender.
For the couscous place the couscous into a heatproof bowl and pour over enough boiling water to cover the couscous by 1.5cm/½in.
Add the olive oil, preserved lemon and lemon juice and a pinch of salt. Stir well, then cover with cling film and set aside for 3-5 minutes, or until all the liquid has been absorbed.
Remove the cling film and fluff the couscous up with a fork. Season, to taste, with salt and freshly ground black pepper.
To serve, spoon some couscous onto each plate. Spoon the tagine onto the couscous and sprinkle over the reserved coriander leaves.
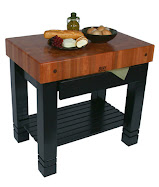
Have a look at our newly updated range of Legnoart Kitchen Trolleys. Beautiful modern design combined with practicality makes the Legnoart range one of my personal favourites. From pullout chopping boards to lift-out waste bins, the kitchen carts are built for stylish living. Legnoart’s most recognisable trolley, the Trix Kitchen Cart is constructed using a bent wood frame and is available in four different colours. A smaller trolley ideal for an open plan apartment, the Trix makes a feature of a well thought out storage and work solution. Despite the unusual design, the trolley has all the familiar elements such as an end-grain chopping surface and towel rails.
The Astoria Kitchen Cart is available in either warm or cold wood, with brushed stainless steel detailing. Shaped in the traditional butchers block style, the trolley features familiar details such as side-flaps, as well as modern aspects such has bottle holders.
The Platinum Kitchen Cart builds upon the Astoria’s base forming out premium kitchen trolley. In addition to the end-grain worktops and lift-out side surfaces, the Platinum cart offers a larger workspace, with marble tops and built-in storage facilities such as a cookbook stand and utensil holder.
Even if you are not looking to buy a trolley, they are definitely worth a window shop!
Red Velvet Cake is one of my all time favourite cakes. Everything about it is deliciously indulgent: from the colour, to the layering of the sponge to the frosting.
I made this cake for my Granny’s 80th Birthday and it went down a treat. It is a relatively unknown cake in the UK, making it a talking point and ideal for a party. Red Velvet Cake looks exquisite when cut, the cream frosting contrasts the four layers of red sponge beautifully providing a feast for the eyes.
I used two Silverwood 9" Sponge Tin to make my cake. The cake cooks quicker, was lovely and moist and came out of the tin without sticking.
1/2 cup (113 grams) unsalted butter, at room temperature
1 1/2 cups (300 grams) granulated white sugar
2 large eggs
1 teaspoon pure vanilla extract
1 cup (240 ml) buttermilk
2 tablespoons liquid red food colouring
1 teaspoon white distilled vinegar
1 teaspoon baking soda
Cream Cheese Frosting:
1 1/2 (360 ml) cups heavy whipping cream
1 - 8 ounce (227 grams) cream cheese, room temperature
1 - 8 ounce (227 grams) tub of Mascarpone cheese, room temperature
3/4 teaspoon pure vanilla extract
1 cup (115 grams) confectioners' (icing or powdered) sugar, sifted
Method: Preheat oven to 350 degrees F (175 degrees C) and place rack in centre of oven. Butter two 9 inch (23 cm) round cake pans and line the bottoms of the pans with parchment paper. Set aside.
In a mixing bowl sift together the flour, baking powder, salt, and cocoa powder. Set aside.
In bowl of your electric mixer, or with a hand mixer, beat the butter until soft (about 1-2 minutes). Add the sugar and beat until light and fluffy (about 2-3 minutes). Add the eggs, one at a time, beating well after each addition. Scrape down the sides of the bowl. Add the vanilla extract and beat until combined.
In a measuring cup whisk the buttermilk with the red food coloring. With the mixer on low speed, alternately add the flour mixture and buttermilk, in three additions, beginning and ending with the flour
.
In a small cup combine the vinegar and baking soda. Allow the mixture to fizz and then quickly fold into the cake batter. Working quickly, divide the batter evenly between the two prepared pans and smooth the tops with an offset spatula or the back of a spoon.
Bake in the preheated oven for approximately 25 - 30 minutes, or until a toothpick inserted in the centre of the cakes comes out clean. Cool the cakes in their pans on a wire rack for 10 minutes. Place a wire rack on top of the cake pan and invert, lifting off the pan.
Once the cakes have completely cooled, wrap in plastic and place the cake layers in the freezer for at least an hour. (This is done to make filling and frosting the cakes easier.)
Cream Cheese Frosting: In your food processor, or with a hand mixer, process the cream cheese and mascarpone cheese until smooth. Add the vanilla and confectioners sugar and process until smooth. Transfer this mixture to a large mixing bowl.
Then, in the bowl of your electric mixer, or with a hand mixer, whip the cream until stiff peaks form. With a large spatula, gently but quickly fold a little of the whipped cream into the cream cheese mixture to lighten it. Then fold in the remaining whipped cream, in two stages. Cover and place the frosting in the refrigerator for an hour or two, or until it is firm enough to spread.
Assemble: With a serrated knife, cut each cake layer in half, horizontally. You will now have four cake layers. Place one of the cake layers, top of the cake facing down, onto your serving platter. Spread the cake layer with a layer of frosting.Place another layer of cake on top of the frosting and continue to frost and stack the cake layers. Frost the top and sides of the cake. Can garnish the cake with sweetened or unsweetened coconut.
Spice up your new year with William Bounds Mushroom Mills. William Bounds rustic mills come with a natural wood finish and contrived with quality artistry and craftsmanship. They have been the creators of world’s finest pepper and spice mills since 1963. William Bounds specialises in a vast variety of futuristic and contemporary designs and styles including salt and pepper sets, salt and pepper combinations, pepper mills, electric pepper mills, salt mills, saltshakers and more!
At originally £24.50 at the Bognor Cookshop this natural finish Mushroom Mill now has a generous 20% off, enjoying table top dining for less at now £19.60!
The Chichester Cookshop and Bognor Cookshop comprise of two shops and a website locally and independently owned. Located on the South Coast of England in Chichester and Bognor, our staff offer great service to personal and business queries, no matter how big or small, no matter where you are in the world.
The Bognor Cookshop offers everything from chef's knives to cake decorating. We stock fabulous accessories and gifts for your kitchen that make cooking fun!
The Chichester Cookshop houses a vast collection of kitchen must-haves ranging from designer barware to paella pans; we are sure to hold an answer to your query.
Offering high-quality service securely online, the website is allowing anyone anywhere to browse and buy at anytime from the Chichester and Bognor Cookshop. - Order online at www.chichestercookshop.co.uk.
Email: info@chichestercookshop.co.uk
Visit The Bognor Cookshop at No.1 The Arcade, High Street, Bognor Regis, West Sussex, PO21 1LH
Telephone: 01243 827750
Visit The Chichester Cookshop at 24 Sadlers Walk, 44 East Street, Chichester, West Sussex, PO19 1HQ
Telephone: 01243 527767